
How to Select Apartment Wallpaper
It’s happening! I am making the move from Manhattan to Brooklyn and I cannot wait to declutter and stay organized. (After finding four old cell phones I realized it’s definitely time to purge my stuff.) But most importantly... I can’t wait to have a new space to decorate! When I moved into my current place, I had a broken foot so painting and decorating before that move was sadly not possible. I’d spend the next 4 years building up serious decor envy! Being such an avid traveler, I took inspiration from hotel rooms and AirBnB’s I’ve stayed in - places like Paris, Santorini, and Tokyo, to create and design my future home.
Starting from Scratch
When I signed my new lease, Brooke was the first call I made. She’s an amazing interior designer with a feminine glam style who I found on Instagram many moons ago. I booked her through an app called Havenly (PS get $50 off using my code JULIE135!).
As a creative, I loved swiping through all of Havenly’s beautiful renditions of their designer's designs so I could pick my favorite before I started shopping. Since I’m starting from scratch, I was so thankful to have Brooke’s expertise through Havenly at my fingertips.
My apartment must-have and first order of business was wallpaper, as I love print and color, and I personally think wallpaper makes a home look more lived in, which was my goal. However, if you’re considering going the wallpaper route, here are some things I wish I knew first!
There are seriously MILLIONS of designs.
I’m not kidding. It took me forever to finally find what I wanted for my three rooms. Brooke helped a lot, but I am a control freak and ultimately choose the paper for 2 of my 3 rooms. I just knew the feeling I wanted them to portray, and it took a lot of time to find that perfect vibe.
How to save a few (hundred) bucks:

I didn't wallpaper behind my dresser, but it worked and I saved $100!
If you want to save a few bucks and are sure you’ll never move your furniture, you can paper just the part of your wall that’ll be covered like I am doing in my beauty closet! Only buying 3 rolls instead of 4 or 5 saved me over $100.
Also if you’re doing more than one room, hire a pro for one room and watch how they do it - and repeat the steps yourself on your other rooms. Just stay away from DIY'ing geometric prints! And saving several hundred dollars? Yes, please!
It takes weeks for them to arrive, so plan accordingly.
Not only does it take forever to look at all your options, it takes weeks for the paper to actually arrive (and I live in a major metropolitan area!). I’m assuming they are made to order with the same color dye lots. But nonetheless, this set me back significantly on my timeline- so give yourself tons of lead time. Also be sure to measure perfectly (and triple measure), because if you need to order more, you risk not being able to get a perfect match ever again (and another 3 week wait!).
Hiring a professional wallpaper hanger is ex-pen-sive.
Be sure you want to invest. For average sized walls about 9’ tall, my quotes came in at about $300-450 per wall. Crazy. But I was already commited so off I went. I decided on 3rd Generation Wallpaper Company in Brooklyn. They’re old school with no website - just Yelp! I loved that. Louis gave me a fair rate and could come the next day - totally necessary as I was moving in 4 days. The handful of people that have seen my place in real life are blown away by how perfect of a job Louis did! I’d recommend getting quotes before you fall in love with a print because it is a serious investment.
There are different types of wallpaper
There’s peel-and-stick, removable, repositionable, and regular. Pro wallpaper hangers may not install peel-and-stick, so be sure to ask what they work with before purchasing anything or hiring someone.
The Fun Part - my Designs!
So after learning all of these things, I finally found my dream walls for my apartment. Here’s what I went with!
Living Room

When you enter my apartment, this wall is the first thing you see, so I needed it to be perfect. I knew I wanted a minimal, yet interesting wallpaper in here, and something I won’t get sick of looking at. This room is on the smaller size (plus no windows) so a light color was a necessity. From the completed designs I got from Havenly, I knew there going to be lots of print and color elsewhere in the furniture. I’m so excited to have this wallpaper be the first thing you see when you enter. It even would make a cool nail design!
UPDATE - I ended up switching up the rug and the layout - let me know below if you want me to do a full room/apartment photo or video tour in the comments!
Master Bedroom

Wallpaper + my diy bedframe
As this is my sleep haven, I wanted to do a solid, dramatic color wallpaper on the wall behind the headboard, but keep the rest of the walls light to really benefit from my favorite feature of the apartment: the oriel windows. Looking back, I realize I could have just painted it and saved myself the expense, but I do love the subtle texture this wallpaper has that would be hard to get with just paint. Now that I see it fully done, I’m not mad that I invested in this room!
Nail Room / beauty closet
Ahhh the best for last!! All my nail furniture (Ikea Pax and Alex units are so perfect for beauty products!). Mine are all solid white, so I decided to go to the dark side with this room's wallpaper - moody with a black background but with dancing, colorful florals to keep it feminine. I’ll also have my white dresser in this room with my makeup and metallic accents on it, so I wanted them to really pop and have a more luxurious feel than a light colored paper would offer.
What do you think? Which one is your favorite? Tell me in the comments!
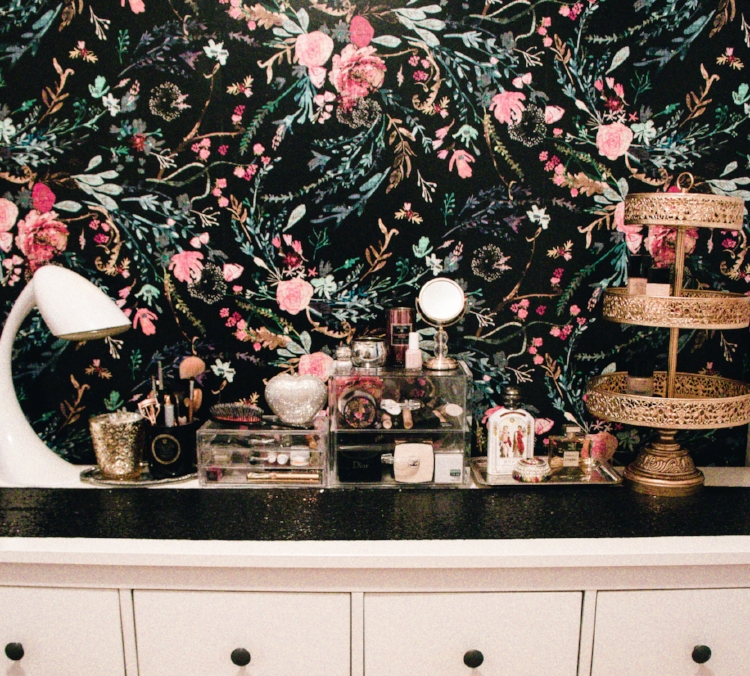
If you look closely, the floral print actually looks like its crocheted!
Edited by Halle Butler, check out her awesome blog too! ---> HalleBnails.com